


lkoivoon
-
Posts
271 -
Joined
-
Last visited
Content Type
Profiles
Forums
Gallery
Everything posted by lkoivoon
-
Hi all. How can I tell that the ozoniser is working/producing ozone?
-
My new 6x2x2.5 'FOWLR + Fake coral' tank
lkoivoon replied to lkoivoon's topic in Members Tank & Specs
You can get the filter bags that are used for washing machines. There are two types - one with big holes and the other very fine holes. Get the fine type and it is fine enough and come in different sizes (40 by 40, 40 by 50, 50 by 50, 50 by 60, 60 by 60). It costs from $3 - $6. Cheers.. -
My new 6x2x2.5 'FOWLR + Fake coral' tank
lkoivoon replied to lkoivoon's topic in Members Tank & Specs
You can get the filter bags that are used for washing machines. There are two types - one with big holes and the other very fine holes. Get the fine type and it is fine enough and come in different sizes (40 by 40, 40 by 50, 50 by 50, 50 by 60, 60 by 60). It costs from $3 - $6. As for the pipe cutter you can get it from harware shop. I am staying in Tampines and I get it from a shop opposite my house at Tampines St 23 BLk 201D. If you want to get from this shop I will get you the shop's unit number. Just let me know. Cheers..... -
My new 6x2x2.5 'FOWLR + Fake coral' tank
lkoivoon replied to lkoivoon's topic in Members Tank & Specs
Strongly recommend to those who like to do diy to buy this tool for cutting the PVC pipe. It is very easy to use (as compared to saw) and it gives a very nice cut on the pipe. It only costs less than $15. I got me at $12.90. Cheers...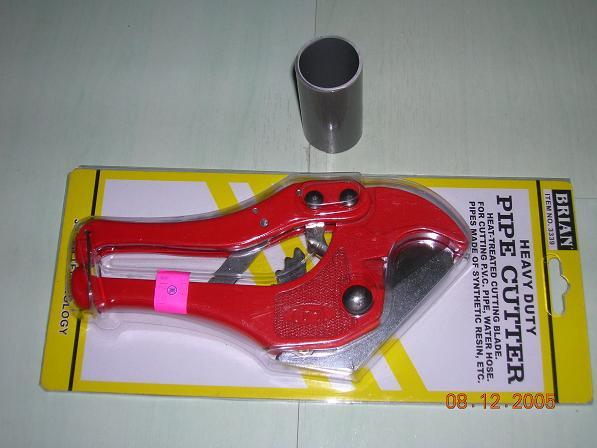
-
My new 6x2x2.5 'FOWLR + Fake coral' tank
lkoivoon replied to lkoivoon's topic in Members Tank & Specs
Full view.
-
My new 6x2x2.5 'FOWLR + Fake coral' tank
lkoivoon replied to lkoivoon's topic in Members Tank & Specs
Left side of cabinet......
-
My new 6x2x2.5 'FOWLR + Fake coral' tank
lkoivoon replied to lkoivoon's topic in Members Tank & Specs
I have more or less completed the setup. This is the right side of cabinet.
-
My new 6x2x2.5 'FOWLR + Fake coral' tank
lkoivoon replied to lkoivoon's topic in Members Tank & Specs
Third and the last cover for the meters etc...
-
My new 6x2x2.5 'FOWLR + Fake coral' tank
lkoivoon replied to lkoivoon's topic in Members Tank & Specs
Another cover for the second electrical power sockets.
-
My new 6x2x2.5 'FOWLR + Fake coral' tank
lkoivoon replied to lkoivoon's topic in Members Tank & Specs
This is how I place the carbon in the sump. The bag has the same width as the sump. Almost all water from the compartment where injection of ozone takes place will pass through the carbon before return back up to the tank.
-
My new 6x2x2.5 'FOWLR + Fake coral' tank
lkoivoon replied to lkoivoon's topic in Members Tank & Specs
Zoom in.....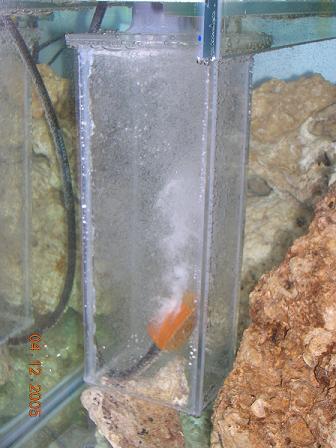
-
My new 6x2x2.5 'FOWLR + Fake coral' tank
lkoivoon replied to lkoivoon's topic in Members Tank & Specs
Again, I am using the overflow for the ozone injection. I removed one of the overflow pipes and replaced it with the diy item for the ozone. An wooden air stone driven by the air-pump through the ozoniser is placed inside the diy item. In this manner, the diy item acts like a counter-current skimmer where air/ozone travels upwards in the diy item and the overflow water travels downwards. Like to check with you guys do you think this will work? Currently set the ozoniser at 25 mg and run for 2 hours per day - just to see whether it works.
-
My new 6x2x2.5 'FOWLR + Fake coral' tank
lkoivoon replied to lkoivoon's topic in Members Tank & Specs
Here is the ORP meter, air pump for the ozone and the ozone. Might add/diy air drier later..
-
My new 6x2x2.5 'FOWLR + Fake coral' tank
lkoivoon replied to lkoivoon's topic in Members Tank & Specs
Here is the ORP meter and its probe..
-
My new 6x2x2.5 'FOWLR + Fake coral' tank
lkoivoon replied to lkoivoon's topic in Members Tank & Specs
I DIY this for ozone. I do not want to inject ozone directly into the skimmer as skimmer is too costly and heard about many problems like valves and o-rings being 'eaten' up by the ozone.
-
My new 6x2x2.5 'FOWLR + Fake coral' tank
lkoivoon replied to lkoivoon's topic in Members Tank & Specs
Hi southpaw23. This is quite funny, because if that is the case then all skimmers will never overflow but maybe you are right as I am still new to skimmers. Anyway, thanks for further explanations. -
My new 6x2x2.5 'FOWLR + Fake coral' tank
lkoivoon replied to lkoivoon's topic in Members Tank & Specs
Thanks sounthpaw23 , now I think I understand how it works. But I still don't get how it can work for non air tight skimmer. In this case, after the WC is filled, although the ping pong ball might be able to stop the skimmate to continue flowing into the WC but the skimmer will continue to produce skimmate and eventually the cup will be filled and overflown with skimmate - did I miss out anything or maybe I did not fully understand how a WC works? Anyway, many thanks for the explanation . I will take a good look at skimmers with WC next time to understand how WC can prevent both air tight and non air tight skimmers from overflowing from its collection cup. Thanks -
My new 6x2x2.5 'FOWLR + Fake coral' tank
lkoivoon replied to lkoivoon's topic in Members Tank & Specs
This way you will get a nice and straight piece of perspex.........
-
My new 6x2x2.5 'FOWLR + Fake coral' tank
lkoivoon replied to lkoivoon's topic in Members Tank & Specs
After cutting (about half the depth into the perspex), place the perspex A on a table and align the line that was cut on perspec A with the side/egde of the table. Then place another perspex B (or anything that is straight and solid) on top perspex A and again ensure that the side/edge of perspex B is also align with the line that was cut on perspex A. Then use one hand to press hard on perspex B (as near to the side/edge of the table as possible) and use another hand to give a sudden jerk on perspex A.
-
My new 6x2x2.5 'FOWLR + Fake coral' tank
lkoivoon replied to lkoivoon's topic in Members Tank & Specs
This is how you use the cutter. You should only cut about half way (or a little bit more but not fully) into the perspex (ie, cut into a depth of about half the thickness of the perpsex).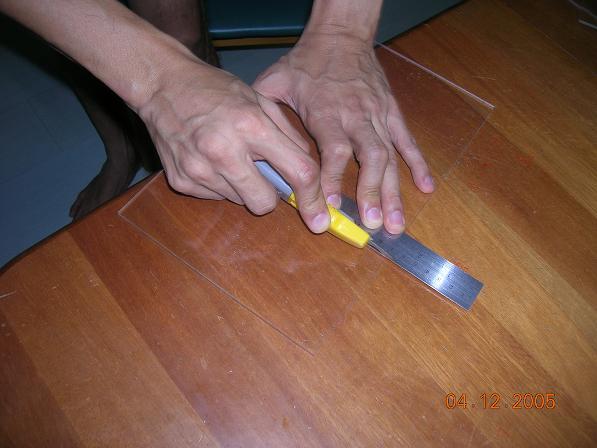
-
My new 6x2x2.5 'FOWLR + Fake coral' tank
lkoivoon replied to lkoivoon's topic in Members Tank & Specs
Hi Patrick, you can get the perspex from Dama at Ubi Road 3 (www.dama.com.sg). If my memory does not fail me, a full piece of perspex of size 4ft by 8 ft is about $30 - $40. You can buy the whole piece and ask them to cut into smaller pieces for you. Or you can just buy any sizes you want. Check with them, it is not very expensive. This a is perspex cutter which you can get from most hardware shop. It should cost less than $10.
-
My new 6x2x2.5 'FOWLR + Fake coral' tank
lkoivoon replied to lkoivoon's topic in Members Tank & Specs
All switches can be reached without removing the cover.......
-
My new 6x2x2.5 'FOWLR + Fake coral' tank
lkoivoon replied to lkoivoon's topic in Members Tank & Specs
The 3 holes are then covered with masking tape to prevent water enters through them into the electrical socket.....
-
My new 6x2x2.5 'FOWLR + Fake coral' tank
lkoivoon replied to lkoivoon's topic in Members Tank & Specs
There are 3 such holes drilled on the protective cover and it is made such that the cover can be removed easily when needed.
-
My new 6x2x2.5 'FOWLR + Fake coral' tank
lkoivoon replied to lkoivoon's topic in Members Tank & Specs
Protective cover in position ......... to prevent water splashing onto the electrical sockets....