
R0B
-
Posts
313 -
Joined
-
Last visited
-
Days Won
25
Content Type
Profiles
Forums
Gallery
Everything posted by R0B
-
What a lovely little tank. Hope the cycle is going well. Just a few observations; Firstly suggest you keep the lights off for the cycle (probably you do that and just added for photo). Do be careful with the deepish sandbed as it can capture detritus especially in a low flow environment (notice no wavemakers just as of yet). Removing sand however can be problematic, so like owning a garden, sand needs attention in the future to keep it clean. No big deal in a small tank. It is early days and I am sure this is going to a successful little tank. What are your plans for it? Euphylia garden? Zoas? Some scollys? Good luck and Keep the posts coming! Sent from Singapore Reef Club mobile app
-

Stay Home, Stay Safe Reef At Home contest
R0B replied to Singapore Reef Club's topic in SRC Contest and prizes section
Posted in both forums. Thanks!! Sent from Singapore Reef Club mobile app -
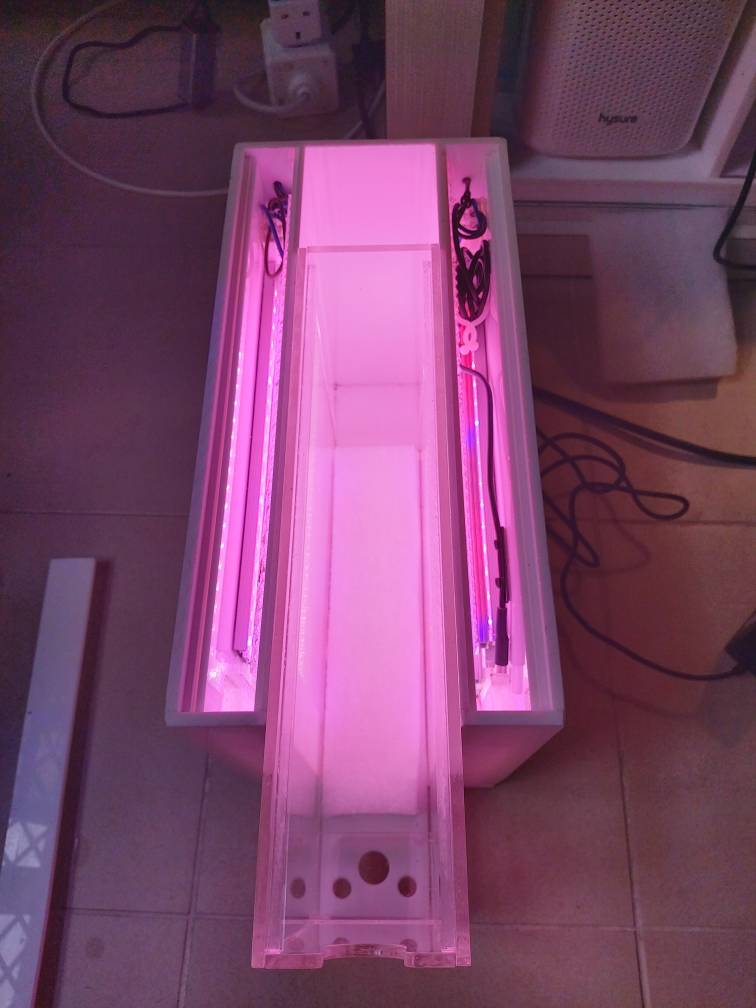
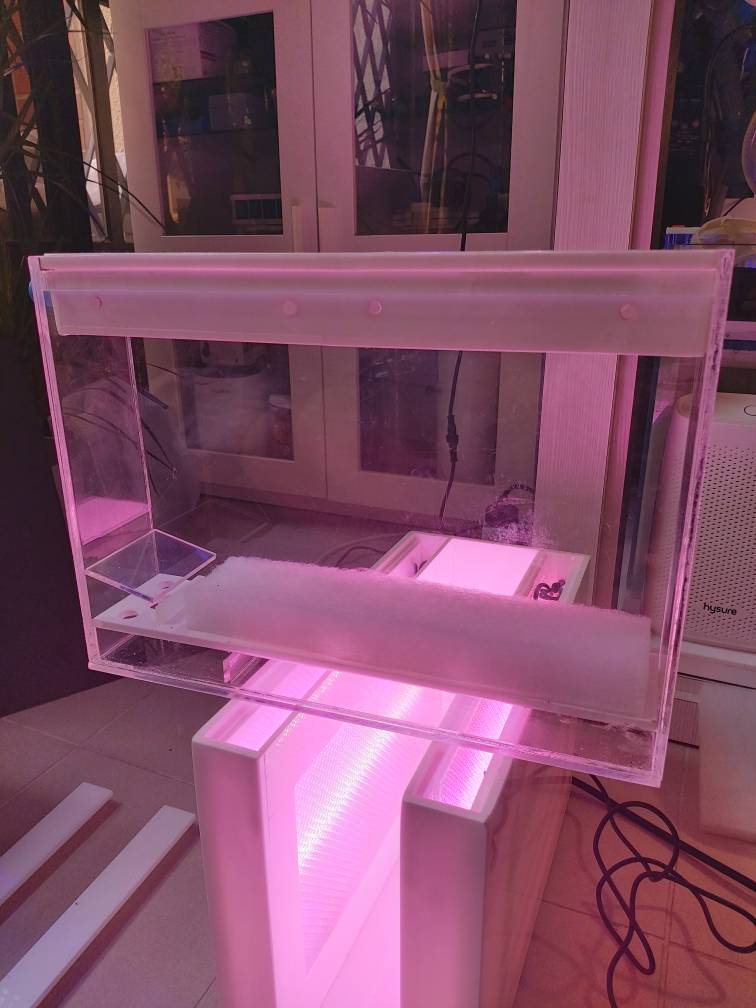
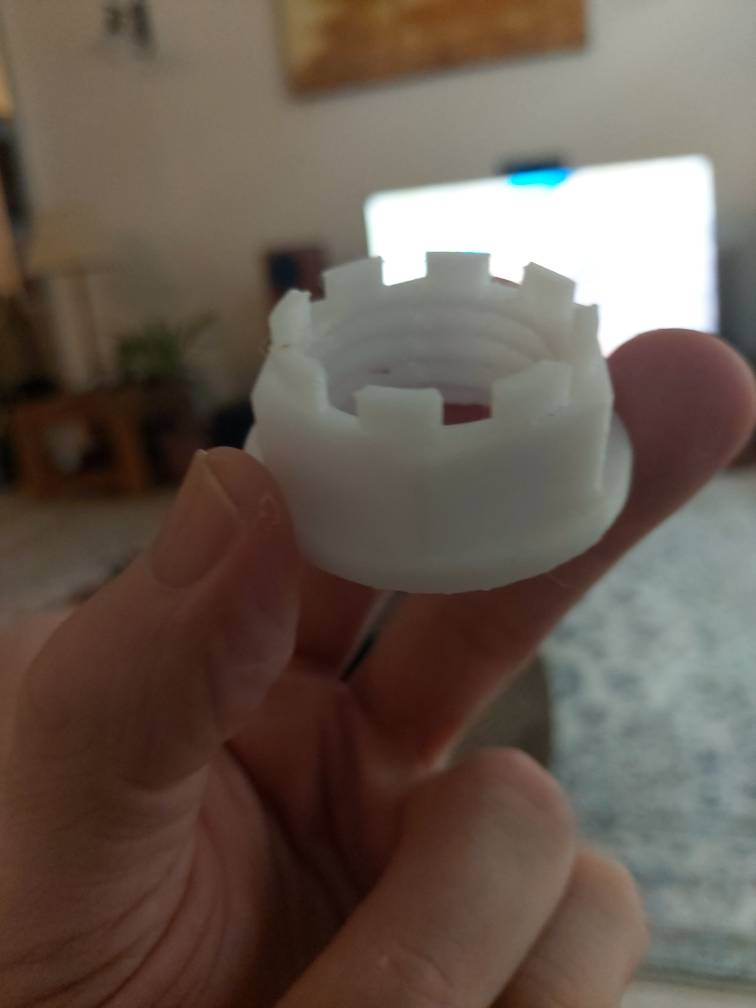
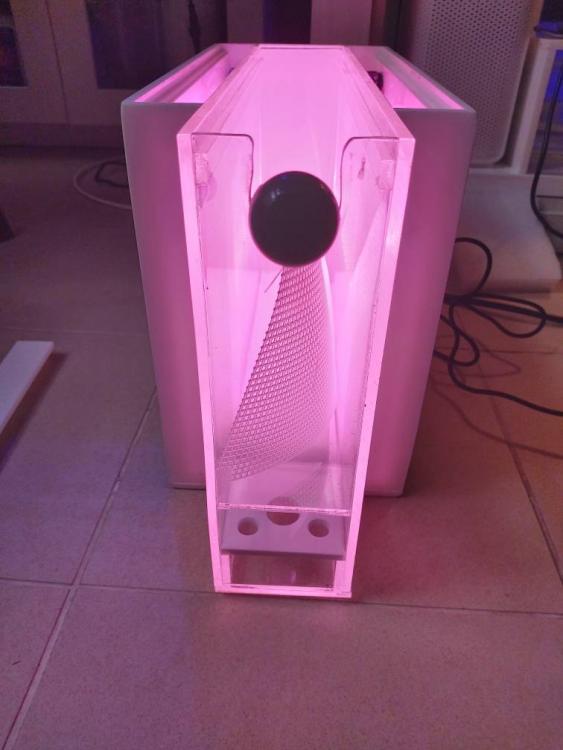
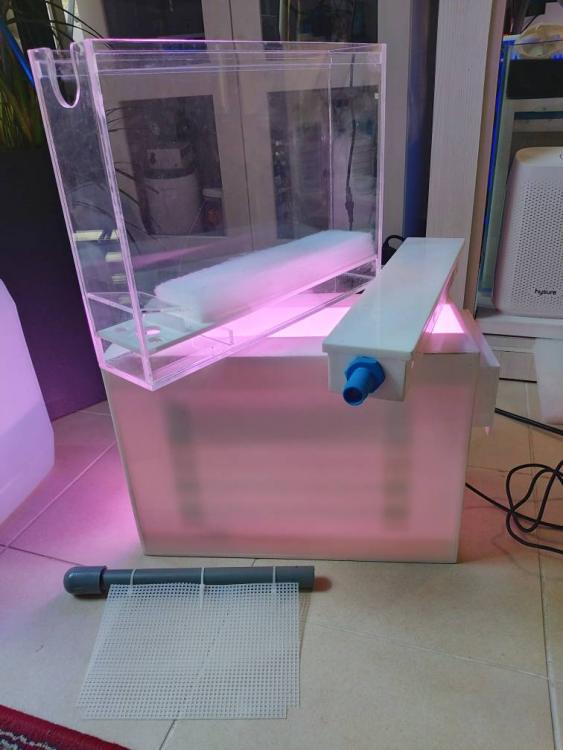
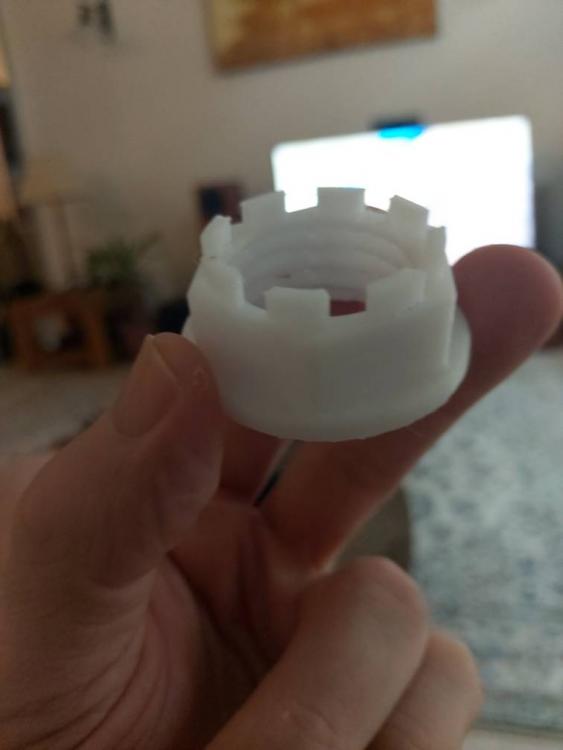
Aanother DIY ATS! So this is a different design of ATS so that the lights are enclosed, so no chance of rust or anything. Using strips of grow lights mixed with some cool whites that I picked up from Sim Lim Tower, I connected them to a temperature regulator circuit which switches off the 12v power if things get too hot within the light compartments. I also added in some air circulating fans to the boards on which the lights sit. These boards allow for the lights to be easily removed for maintenance. I took some measurements with my Seneye and it registered around 210 PAR from one side (seneye only points in one direction haha) so I guess that means the centre will get over 400 PAR which should be more then enough to grow the GHA. The plumbing is not yet done as Covid19 CB rightfully put a halt on the shopping trip to the plumbing shop. The GHA grows on a mesh screen which will spill into a pull out clear acrylic box. This should mean that cleaning is really easy as you dont have to remove everything. Just unscrew one pvc union and pop out the box! I accidentally made the unit 1cm too big for my sump DOH! So I am giving this unit away to a nice reefer (there may be some drag involved haha). So as we figure out how they are going to have the unit installed I can adjust the plumbing so it either drains from the bottom or the top. I started to 3D print a connector for some soft plumbing. I have the connector installed on the other ATS I built. Then ran out of filament so only managed the internal part. Acrylic was from DAMA near UBI mrt station. I find their prices good and their service is top notch. Is great to support a local business. Anyways let's hope we can get this installed soon. Sent from Singapore Reef Club mobile app


-
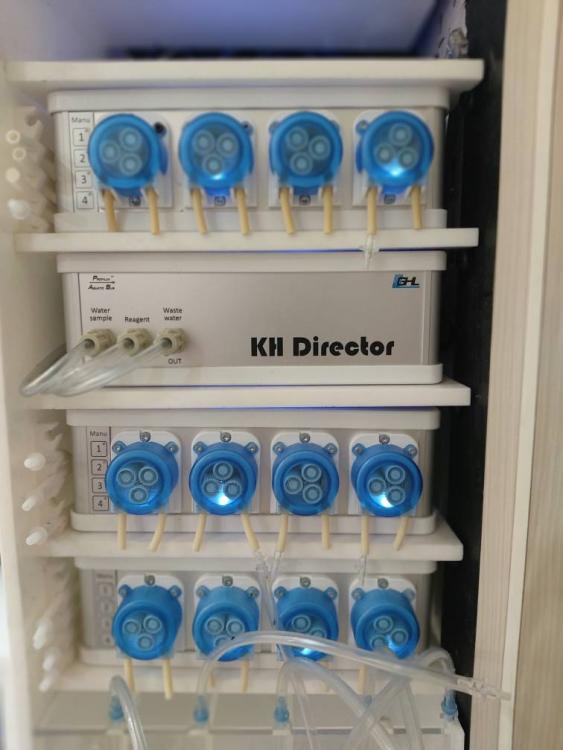
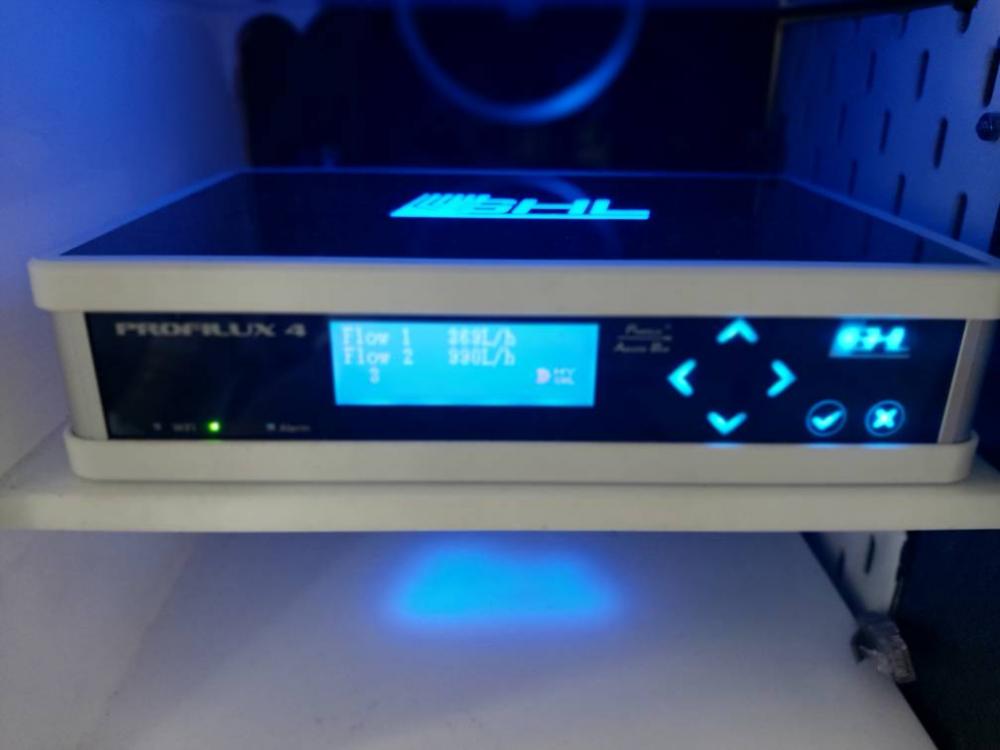
Objective 2: Stability. I plan on using a combination of known tools and techniques along with the latest technology to ensure that the parameters are super stable (or at least ensure that change happens in a controlled and purposeful manner based on real data). The aim here is to use 'old school' reefing techniques to get the water parameters close to where the tank needs them to be (each tank is different). However, to ensure exact stability I plan to use automated testing and control systems to control dosing. These will come in the form of the new GHL ION Director (still on order... with Covid19 impact I suspect August delivery) and the GHL KH director. So how will these be used exactly? Well, let's look at the case of keeping Calcium stable as an example. Imagine there is a need to keep calcium at say 440. The idea is to use a Calcium Reactor to cover the base need and get into the 410+ range. The good news is that Calcium reactors are actually Alkalinity and trace element Reactors too, they are also sudo 'set it and forget it' kind of tools, hence fairly low maintenance.. They look complex but are actually reasonably simple. Pegging the calcium reactor to a specific PH will dissolve the media at a set rate. Changing how much of the effluent enters the tank will allow me to control the level of Alkalinity and Calcium. Additionally i plan on adding Kalkwasser. Line water has been used for years to increase the levels of calcium, but there are often issues attached to how this is implemented or overused. Anyways I will again use my doser to control. The idea is to use it sparingly to boost the calcium and bring this up to say c.435. Kalkwasser will also increase the PH to offset the CR effluent which is rather acidic. Finally, and this is where the latest technology comes into play, I intend to implement an automated testing system that measures Calcium throughout the day (the GHL ION director can test calcium 24 times a day without the need for reagents). This ION director will be linked to my dosing pumps to contol the level of calcium that is then dosed via traditional balling supplements. In allowing the system to just control a small amount of dosing I can ensure that no catastrophic overdosing or underdosing will occur. But the tank should see a vary stable level of calcium. The idea is that if demand increases the doser will automatically adjust upwards its dosing amount (if I see this need continue as a trend in the long term I can just dial up the flow rate on the CR to set a new base level). If demand decreases then the doser will reduce the amount of calcium dosed (similarly if this is a longer term need - maybe I removed a coral - then we can simply dial back the flow rate on the CR). Stability is key. Similarly Alkalinity will not only be delivered via the calcium reactor but the final level of control will be via the GHL KH director which will be in charge of the most important task of keeping ALK in check. It will test Alkalinity about three times a day and make minor alk dosing adjustments accordingly. ...It will be interesting to see if this works! Haha Sent from Singapore Reef Club mobile app
-
Secondly, when I think about control, I want to be able to control the parameters as much as possible. [ ] Temperature is controlled via a chiller and some fans [ ] Salinity is controlled via an ATO nothing radical there. Standard stuff, but what about the other elements? Well this is where you can have fun... [ ] For PH I plan on using differing air sources to keep PH both high and stable. A simple Recirculating CO2 scrubbing system and carbon filtered air tube from from outside will be controlled to maintain PH. The idea is that the scrubbed air will increase the PH and a tap or even solinoid will be activated after when the PH gets too high (the irony typically people want a high PH!) As such PH will be more stable. [ ] For nutrients (and PH) I plan on using different length photoperiods to manage nutrient reduction via an ATS and Refugium (yep both! Haha); Reverse photosynthesis will also be used to keep the PH stable. The control will not only come from controlling growth rates (dragons breath grows much slower then chaeto), but also from measuring the amount of a particular macroalgea is needed. [ ] For Alkalinity and Calcium it will involve implementing the likes of a Calcium Reactor with an adjustable continuous dosing pump to vary the flow of effluent, and thus, control the level of calcium and alkalinity entering the tank. Again nothing too new. However, this will be supplemented with the latest automated testing equipment which will automatically control a secondary dosing amount. [ ] For Phosphates I plan on using a reactor with GFO (along with an initial Lathium Choloride dose). As standard GFO can strip ALL the phosphates out of the system I am going to use a special product from Fauna Marin that keeps the level of phosphate stable at 0.04 irrespective of how much you put it (beyond a minimum amount). Basicslly a 'pace it and forget it' approach. Well not quiet but is certainly still low maintenance. [ ] I also will implement the KZ Zeovit system to control nutrients via the zeolite rocks which strip ammonia A SKIMZ automated zeovit reactor (keeping it local - great product btw) will wash the mulm at regular times in the day. KZ products (yep those little blue bottles) will add nutrients back into the tank in a controlled manner. It will be interesting to see how I can incorporate the successful zeovit system into my overall setup, as typically with zeovit you don't run a refugium, carbon or a UV and I plan on all three) That said the more I have read I have seen many systems using a hybrid approach with zeovit at its core and still still massive success so I intend to emulate those. So, once you some tools available to you as a reefer then the next thing to think about is how to use them in concert to gain Stablility. I will cover that next... Until then Happy Reefing! Sent from Singapore Reef Club mobile app
-
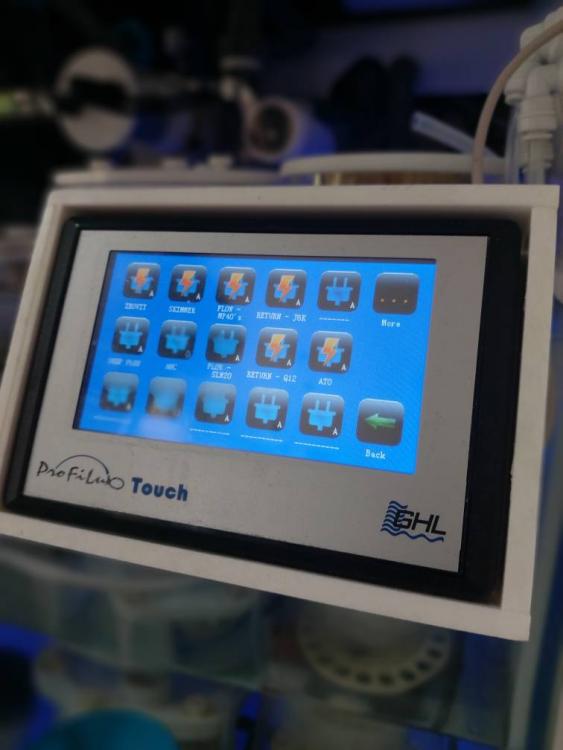
Part II They say that knowledge is key, so I hope you indulge me as I go into a little more detail surrounding my objective of having a controllable, stable, pest free, ultra low nutrient tank. Objective 1: Controllable: There are several different use cases that spring to mind when I think about what I mean by having a 'controllable tank'. Firstly there is the technical ability to control equipment on my tank. Whilst there are many ways to achieve this at a basic level with the use of timers or even smart plugs. For the automation I had in mind this will involve implementing an aquarium controller to run: [ ] various safety measures (e.g. switching off the skimmer if the water level is too high in the sump, or switching off the return pumps if the water level gets too low) [ ] Programming a few sub-routines relating to the equipment (Creating 'maintenance' sub-routines to switch off various pieces of gear as and when I need OR 'feeding modes' that switch off the skimmer and wavemakers for a set time when I want to feed the corals. [ ] Introducing Automated Water Change functionality. [ ] Using flow meters to control water flow into the tank and key elements such as UV systems. Basically being able to switch gear on/off at the press of a button or based on some reading from sensors or probes. Sent from Singapore Reef Club mobile app
-
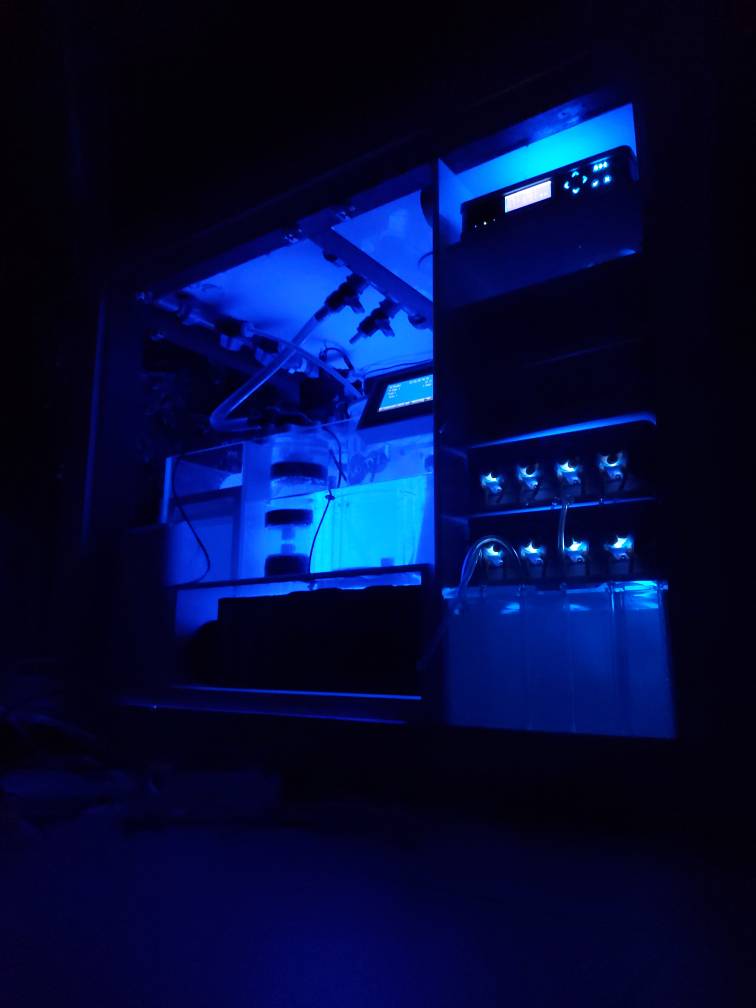
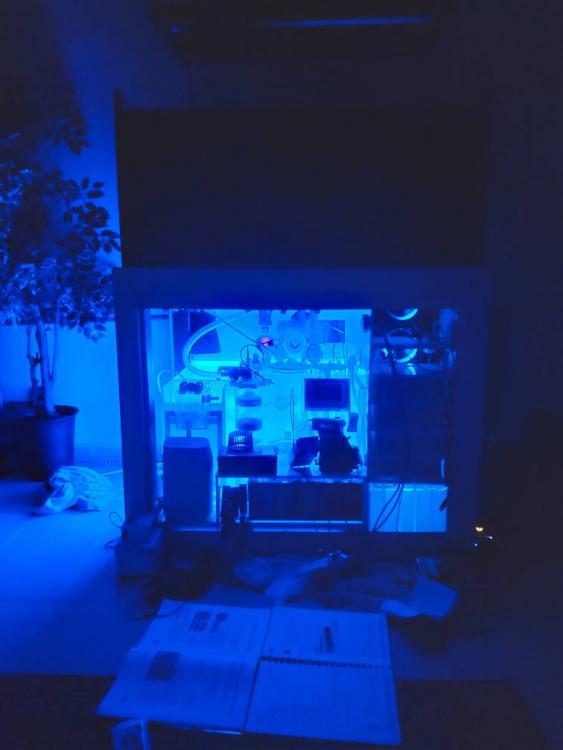
(Hopefully these teaser photos work) Sent from Singapore Reef Club mobile app

-
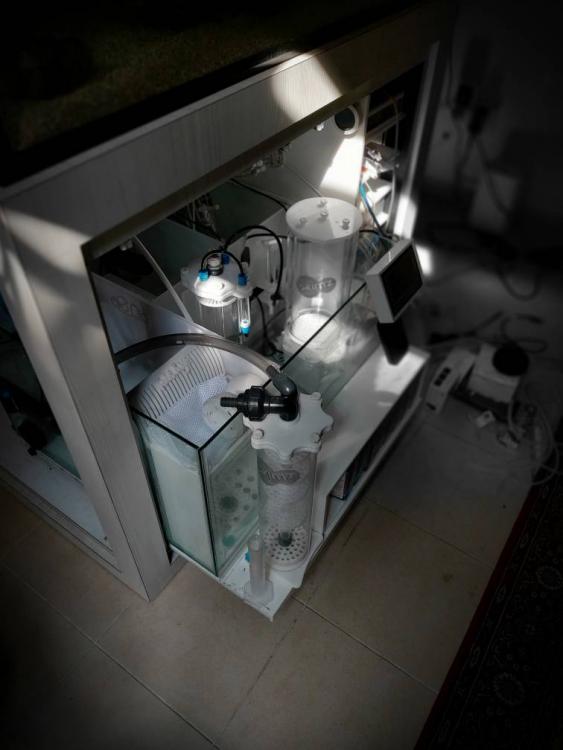
Hi. Welcome to my little box of water build thread. Over the next few posts I am going to go into some detail about my system setup and the choices I made. I hope you find it useful, not just to see what goes into a reef tank, but also the reasoning behind why I selected what I did. So first off some background, I have been reefing for 8+ years and I am just about to 'start' my fourth tank. It is a 510L system (sump, tank and connected mini 40L frag-tank). The main display is 42 inches (107cm) by 30 inches (76cm) and is 20 inches (50cm) high. It isn't a massive display tank, but with a good height and depth I hope to do something interesting with. The aim is an SPS dominated system with a semi-minimalist rockscape creating some negative space for the fish the actively swim in and to provide some room for a few clams and LPS islands. So, when I say i am about to 'start' that isn't technically correct as the tank is actually already setup and has been 'cycling' for nearly 10 weeks now (The aim is to follow WWC's 16 week initial cycle). I hope to bring everything I learnt from my previous success and failures in the hobby. What is so awesome about keeping a little bit of the ocean within our homes or offices is that the hobby is always moving forward always changing. As technology and knowledge improve it is getting easier to succeed, so with my new setup I see it as a great opportunity to use the latest tools and techniques. I also see this tank as a testbed for some ideas I have around automation. My idea of a low maintenance tank is one that uses te technology to run itself. What I have learnt in the hobby is that you need to make good decisions on your tank. They ultimately save you money. Yes, there are normal constraints like budget or size or even knowhow, but I managed to scrape together some interesting tools and it didn't cost the earth either. Luckily knowledge is something that is free. So I decided to write out a set of objectives for the tank and plan accordingly. Tank Objective: To design a tank that is easy to maintain and uses various systems and tools to run itself with minimal intervention (as I am not always around to look after it). To improve my chances of success it should be a controllable, stable, pest free, ultra low nutrient tank. The tank should be stocked with attractive corals and interesting utilitarian fish and invertebrates. In the next post I will go into some detail about how I planned to achieve this... Sent from Singapore Reef Club mobile app

-
Yep Dr Tim Hovanec sure does know his bacteria. I think over time many companies have got a little better at this. Brightwell certainly has improved and is a good source too. But I trust Dr Tim's products. I use the one and only as well as the eco balance and also have the waste away product. If you watch his MACNA presentation (via youtube) on how to use bacteria to cycle a tank, he gives some great tips on how to get through a good cycle. Well worth the time to watch. Good luck Sent from Singapore Reef Club mobile app
-
Cycling with Dr Tim ammonium chloride
R0B replied to Azil.HA's topic in New to the Marine Aquaria Hobby
I would think it is a bacterial bloom, most likely from ammonia build up, I would stop adding anything to the tank or at least cut down. Maybe a drop or two once in a while is ok if still no fish. Do you have diatoms? any slimy brown algae forming? Is your skimmer up and running now, and pulling out brown liquid? (Remember Keep those lights off haha). All the best. Sent from Singapore Reef Club mobile app -
Good luck on your mixed reef, possibly the most difficult of tank styles to get right. And it is difficult for several reasons, with lighting being just one. SPS works best with a par range around 250 to 350 PAR, LPS typically happy between 100 to 175 and sorties below 125. This range of lighting needs are typically solved by layering your corals with the SPS up high on the rockscape and the LPS towards the bottom with the softies strategically placed. Now to achieve a good spread of light across your 40 inches of tank is going to be a challenge. Light placement with respect to mounting height and light spacing should be a key consideration. If you run one xr30 you are going to struggle to get an even spread across 40 inches unless the light is fairly high up. It is a powerful light, but you are still likely to get a hotspot in the centre of the tank as the pucks on the XR30 G4 are close together. Further, you will also need to consider shadowing issues when the corals grow out. Another option is to have two xr15's spread about 14 -18 inches apart and raised up about 12 inches off the water surface. This should give you more even spread across the tank then the single xr30. However, to get the PAR you need you are probably going to have to run these close to max to get 250+ PAR at 12-18 inches of depth. A solution to this is to add a few T5's to supplement (check out the aquatic life hybrid). T5's provide a more subtle light source and will help with any shadowing you may suffer from with just two 90w LED lights. A further option is to have even more lights, if 3 xr15's isn't an option then a couple of AI primes for either side of the current xr15 may work well. Now completely out of left field.... have you checked out the Evergrow IT5012 / IT5080 lights. I think SAS have them (CB covid discount). ReefDorks youtube video on them is very compelling. These are growing in popularity and I have started to see more and more of these on various youtube/instagram show tanks. (Another light I know people are also keen on is the Illumagic Blaze X. Possibly the most common light over a three or four foot tank if you live in Australia. So many options!). Personally I would choose multiple xr15's not because they are better, but simply more adaptable. I know corals can grow under Radions so that isnt a problem. Couple the xr15's with the T5's and you will have a lighting rig capable of growing pretty much anything! Good news is you can build up your collection of lights slowly. Be good to hear what a few other have to say. Anyways Can't wait to see what you end up doing. Good luck! Sent from Singapore Reef Club mobile app
-
Yes it is most likely the bacteria. If you are dosing any beneficial bacteria it is good idea to stop now. It should clear up in a few days. It is all out warfare in your tank right now as the Ammonia oxygenating bacteria fight it out with the Nitrite oxidizing bacteria for dominance and real estate. Eventually the tank will settle down. Just wait. Time to figure out how you plan to keep your nitrates in check in the medium and long term. Good luck. Exciting times ahead! Sent from Singapore Reef Club mobile app
-
It does have a cloud function. There is an additional 'Websever' box you need to be able to connect it to the cloud. Sent from Singapore Reef Club mobile app
-
Yep, it has a graph where the spectrum is shown. I am not sure how accurate it is, but for sure it gives a very good indication of what your lights are doing. I remember BRS saying it was very close in accuracy to their high end testing equipment. So that is good enough for me. In addition it measures both PAR and PUR as well as Kelvin and Lux. You can also use it to keep an eye on your ph, ammonia, temperature and water level. Generally a great little tool. Sent from Singapore Reef Club mobile app
-
Sounds like you have a great lighting set up. I can lend you my Seneye post the CB if that helps just PM me. Sent from Singapore Reef Club mobile app
-
Oh that one is really good idea. You could make mini version for dosing containers too. Does anyone know where to pick up some filament during CB as I just finished all of mine? Thanks Sent from Singapore Reef Club mobile app
-
Looking good. The new Tunze skimmer is a good move. The hang on refugium... keep the flow up, if the Chaeto starts to turn brown then you need to remove, but hopefully it will keep the chaeto alive. The TLF phosban reactor is a good move. They have a new bottom cap that turns it into a bio pellet reactor (hmmm maybe a new 3d printing project). Looking good. Keep up with the maintenace and it will continue to flourish. Well done. Sent from Singapore Reef Club mobile app
-
Overall consistency is key, assuming you dont have a PAR meter (Seneye, Apogee?) to guide you. So the key is keeping spectrum same but adjusting the intensity. The HD26 is suitable for a 2ft tank (like most 90w lights), so depending on how big your tank is (how big is it?) you will get an overlaping of the light. Clearly a smaller tank will see more direct overlapping (meaning you have to change the intensity on all the lights). Space the lights wider then you think. Whilst an even distribution of the lights looks nice you can end up with some segments getting 3 light sources (1 direct and 2 indirect) which can end up with a centre spot being twice as intense as the outer parts. On smaller tanks this overlapping is like 3direct light sources. The increasing in height will help distribute this more evenly. One way I have coped with this in the past is to increase the height of my lights by 2 to 3 inches and reduce the photoperiod by a few hours at the start. Another solution I found that worked is to increase the lights a few inches (mine are now 12.5 inches above the tank), and reduce the centre light intensity to 10% and slowly increase it overtime. I wonder why no LFS has an Apogee that you could rent (any LFS listening? Haha). I have a Seneye which works really well as for measuring PAR and Spectrum. You will be amazed just how much certain areas of your tank differ in PAR. I completely changed the light setup raising the lights and physically spacing them wider to get more even spread it was also why I move to a hybrid t5 solution to gain more blanket effect. Then again maybe you want an area with slightly higher intensity depending on your mix of corals. So increase height if can, else reduce centre intensity. Hope that helps. Sent from Singapore Reef Club mobile app
-
Nice. I like the negative space in the tank allowing for the fish to swim more freely. Also not too high... planning for those SPS to grow into super sized colonies I see haha. Well done looking really good, thanks for sharing. Do you have any photos under the hood (Sump)? Sent from Singapore Reef Club mobile app
-
A skimmer and an ATS (in my humble opinion) make a perfect pairing. Turf scrubbers are great to pulling out nutrients, whilst a skimmer is excellent at waste removal as well as air exchange (which helps the co2 escape, increasing your ph). If shopping for a skimmer get one that is sized for the tank (and not one too big or too small). I made the mistake of getting one way to big for my system. I run a filter roller and have an ATS so by the time the water got to the skimmer there wasn't enough nutrients in the water to maintain the bubbles, so no matter what I did I ended up with loads of micro air bubbles in my tank (not great). As soon as I switched to a smaller skimmer I got perfect skimmate and no bubbles. Personslly I would recommend an ATS and Skimmer pairing. BRSTV just did a little segment on the clear water scrubber, worth checking out, and they also did one on the benefits of an ATS.. always good watching. Good luck on the cycle. Sent from Singapore Reef Club mobile app
-
Awesome. Do you feed your corals? Or follow a particular system like AF or Zeovit? Sent from Singapore Reef Club mobile app
-
Wow what a great set of tanks. Thanks for sharing! What do you think is your key to SPS success? (How do you maintain your paramters?) Sent from Singapore Reef Club mobile app
-
Cycling with Dr Tim ammonium chloride
R0B replied to Azil.HA's topic in New to the Marine Aquaria Hobby
Sounds like all is going well. 10ppm is good at this stage. Ammonia is still not at detectable levels (or dodgy test kit haha). Are you seeing any brown diatoms on your sand now? This is the next stage, as you may start to see the diatoms and possibly a brown algea appear. This will last for a few weeks. Adding Ammonia, agree with Mr Soggy, you can add a little to simulate fish in the tank. Reefgrrl produced a daily video of a typical cycle. Is interesting to see (just remember each tank is slightly different) Regarding what to do next. Think of the fish stock. Here is a "stocking strategy" Also I would start to educate yourself on the basics of salinity, Alk, calcium and Magnesium. All the best. Sent from Singapore Reef Club mobile app -
What a great idea! I may use this to make a quick connect fitting for my Roller Mat. I really think that 3D Printing is the perfect accompaniment for reefing hobby. Thanks for sharing. Sent from Singapore Reef Club mobile app
-
Tank still looks good. Love the little dart fish. Something different. Sent from Singapore Reef Club mobile app